The debate of youth working out has raged for decades, the stunting of growth, increased injury-all worries of a parent or guardian. While science has consistently proven the benefits of working out when performed smart and safely for youth, you still have a small population who says otherwise.

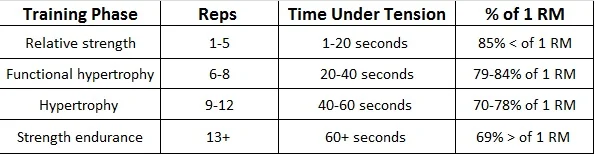
Institue 3's age-specificity training table - ages, physical maturity, and athletic ability dictate which training methods we use for the training aspects on the left.
Any qualified strength training professional realizes that it's safe for all ages to participate in working out, but all ages have different training needs. At Institute 3e this is our biggest challenge, helping parents understand why/what we do with different ages. Age-specificity is a huge part to our training success, obviously we don't train a 16 year old the same as an 8 year old, every individual has their own needs. These needs are determined by...
Athlete's age - while age isn't the only predictor of training styles used, it's a component of assessing which training needs will be sought out.
Physical maturity - every athlete develops at different rates-this determines the training methods used within their age-specific training style.
Athletic ability - not all athletes are created equal, methods will vary according to ability, this aspect often goes hand in hand with physical maturing.
Every athlete has their own needs, every athlete requires varied instructions and exercises fully dependent on their abilities. Aside from improving already developed skills we always stress the importance of putting in the work at a young age. Accumulation of training years is huge for a young athlete's future success.
So does lifting cause stunting of growth and increased injury?
When you play a sport there is already an inherent risk of injury, strength training does not increase one's risk for injury when used properly. In a review performed to assess strength training in children and adolescents multiple factors were assessed and found.
Injury - Any form of injury was always related back to misuse of equipment or lack of supervision. At Institute 3e we have multiple trainers working with every team to ensure safety and proper form. Along with this, we take a lot of time going through progressions to ensure proper form and movements are learned/adapted to.
Strength - It was found that children/adolescents can improve their strength anywhere from 30-50% after 8-weeks of training consistently (strength %'s vary by athlete). Strength at Institute 3e doesn't just mean moving weights, it means moving the body in a stronger way. For example, a lot of our athletes have trouble climbing the rope their first visit, after coming consistently climbing the rope becomes easier and attainable. This is a form of tracked progress for us, methods we're using have made your athlete stronger in a safe way.
Denser bones, stronger tendons, muscles, and ligaments - In a study examining the positive effects strength training has on youth 9-10 years old, bone and lean mass both increased. While some mass change was associated with normal growth, it was seen that strength training helped increase normal rates in a healthy manner. When muscle and bones get stronger the tendons and ligaments will do so as well.
Growth plate injuries - In a review assessing youth/adolescent growth plate injuries it was observed that sports and poorly made programs played a large part in injuries. While some injuries an unavoidable and purely accidental, there are countermeasures that can be taken to decrease injury prevalence. The countermeasures noted in this review involve: smart coaching, individual programming, and attention to individual's needs (health & physical). All aspects we commonly practice at Institute 3e.
When playing sports and working out there will always be risk of injury, especially in high-speed contact sports. The most important aspect to healthy growth in younger athletes is careful supervision and well-designed exercise programs. We make it a point to structure our workouts to an athlete's age, physical maturity, and athletic ability to ensure safe and optimal growth.